Search This Blog

Friday, July 15, 2016

Example of Custom ListView in Android


Data Containers in Android:

Usually in android to represent data in list format , following UI components are normally used

1) ListView
2) Expandable ListView
3) GridView
4)RecyclerView  -  Now a days mostly used
4)Gallary

So lets see each in details with simple Examples


1) ListView:

 ListView is one of the UI component in android used as a container to represent data in in verticle scrollable format .
In this list items are added automatically using Adopter

We can implement ListView in normal way and using CustomAdapter.

In normal ListView we set list items using String array or list object ,and in custom ListView we can set list items using custom Adapter class which will extend BaseAdapter class.

Fig. ListView Example


Lets start with new project:

Fig. Directory Structure of example


activity_main.xml


<?xml version="1.0" encoding="utf-8"?>
<RelativeLayout xmlns:android="http://schemas.android.com/apk/res/android"
 xmlns:tools="http://schemas.android.com/tools"
 android:layout_width="match_parent"
 android:layout_height="match_parent"
 tools:context="com.ygutte.example_of_listview.MainActivity">
 <ListView
   android:id="@+id/list"
   android:layout_width="match_parent"
   android:layout_height="match_parent">
 </ListView>
</RelativeLayout>
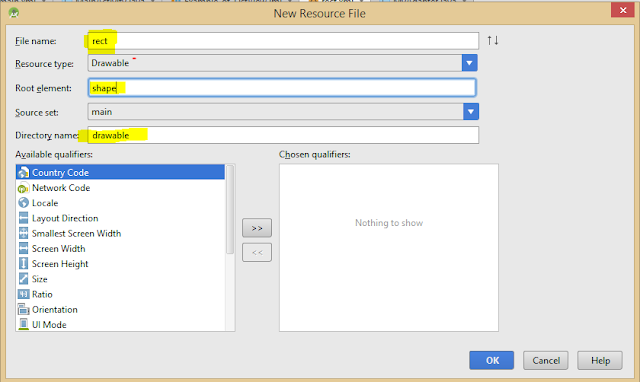
Before going to create UI for indivisual list items of list view lets create an rectangle shape to draw border line around list items

assets-> right click ->new Android resource file


** Must see the yellow marked text

rect.xml


<?xml version="1.0" encoding="utf-8"?><shape xmlns:android="http://schemas.android.com/apk/res/android">
    <stroke android:color="@android:color/holo_orange_dark" 
     android:width="1dp"/>
        <solid android:color="@android:color/transparent"/>
    <padding
       android:left="5dp"
       android:right="5dp"
       android:top="5dp"
      android:bottom="5dp"        />
    <corners android:radius="5dp"/>
</shape>


Above code will create  orange coloured border around each individual item in the list.


list_item.xml
  <?xml version="1.0" encoding="utf-8"?>
  <RelativeLayout xmlns:android="http://schemas.android.com/apk/res/android"
      android:layout_width="match_parent"
      android:layout_height="match_parent"
      android:background="@drawable/rect" >
  <ImageView
       android:id="@+id/ImgPhoto" 
       android:layout_width="50dp"
       android:layout_height="50dp" 
       android:src="@drawable/frnd1"/>
  <TextView
        android:id="@+id/tvInfo"
        android:layout_width="wrap_content"
        android:layout_height="wrap_content"
        android:text="name" 
        android:layout_gravity="center_horizontal"/>
  </RelativeLayout>                                                                          

 Now lets create Adapter class to set custom view


MyAdaptor.java


  package com.ygutte.example_of_listview;

  import android.content.Context;
  import android.view.LayoutInflater;
  import android.view.View;
  import android.view.ViewGroup;
  import android.widget.BaseAdapter;
  import android.widget.ImageView;
  import android.widget.TextView;

  import java.util.List;

/** * Created by Yogeshwar on 7/15/2016. */  public class MyAdapter extends BaseAdapter
{
    Context context;
    String[] names;
    int[] photo;
    public MyAdapter( Context context,String[] names,int[] photo)
    {
        this.context = context;
        this.names = names;
        this.photo = photo;
    }


    @Override    public int getCount() {
        return names.length;
    }

    @Override    public Object getItem(int position) {
        return null;
    }

    @Override    public long getItemId(int position) {
        return 0;
    }

    @Override    public View getView(int position, View v, ViewGroup parent)
    {

        LayoutInflater inflater = LayoutInflater.from(context);
        v = inflater.inflate(R.layout.list_item,null);

        ImageView imgPhoto = (ImageView)v.findViewById(R.id.ImgPhoto);
        TextView txName = (TextView)v.findViewById(R.id.tvInfo);

        imgPhoto.setImageResource(photo[position]);
        txName.setText(names[position]);

        return v;
    }
}                                                                                            


Now lets move to main code...

MainActivity.java


  package com.ygutte.example_of_listview;

  import android.support.v7.app.AppCompatActivity;
  import android.os.Bundle;
  import android.widget.ListView;

  import java.util.List;

  public class MainActivity extends AppCompatActivity {

    public ListView friends;

    @Override    protected void onCreate(Bundle savedInstanceState)
    {
        super.onCreate(savedInstanceState);
        setContentView(R.layout.activity_main);
        friends = (ListView)findViewById(R.id.list);

        String[] name = {"Abhijeet",
                         "Amol",
                        "Ganesh",
                        "Hanumat",
                        "Rohit",
                        "Sagar",
                        "Sanket",
                        "Vaibhav"};

        int[]  photo= {
                        R.drawable.frnd1,
                        R.drawable.frnd2,
                        R.drawable.frnd3,
                        R.drawable.frnd4,
                        R.drawable.frnd1,
                        R.drawable.frnd2,
                        R.drawable.frnd3,
                        R.drawable.frnd4
                };
        MyAdapter adapter =new MyAdapter(this,name,photo);

        friends.setAdapter(adapter);

    }
}                                                                                            


Click here to Download Code


Happy Coding.......................


Thursday, July 7, 2016

Example of Custom AutoCompleteTextView in Android


Custom AutocompleteTextView :

Hi friends as i have already discussed about AutoCompleteTextView in my previous post

Click here  for  previous example of AutoCompleteTextView.

And now in this example we will going  to see the example of how to implement the CustomAdapet for AutoCompleteTextView.

So lets start with new Project.
as follow

To show string with image as......


OR

To show Only string as .......


So lets star as  .....


Project Directory will be as....


activity_main.xml
Its a layout file for  MainActivity class


<?xml version="1.0" encoding="utf-8"?>
<RelativeLayout xmlns:android="http://schemas.android.com/apk/res/android"
    xmlns:tools="http://schemas.android.com/tools"
    android:layout_width="match_parent"
    android:layout_height="match_parent"
    tools:context="com.ygutte.customactv.MainActivity">

    <AutoCompleteTextView
        android:id="@+id/ACTV"
        android:layout_width="match_parent"
        android:layout_height="wrap_content"
        android:inputType="textAutoComplete|textAutoCorrect"
        android:background="@color/colorPrimaryDark"
        android:layout_marginTop="20dp"
        android:textColor="#fff"
        android:hint="State.."
        android:paddingLeft="10dp"
        android:textSize="30sp"
    />

</RelativeLayout>


indi_item.xml

This is layout for individual items i.e. strings  or string and image we going to display as suggestion

so go to res->drawable folder-> create new XML layout file as..
indi_item.xml
<?xml version="1.0" encoding="utf-8"?>
<RelativeLayout xmlns:android="http://schemas.android.com/apk/res/android"
    android:layout_width="match_parent"
    android:layout_height="match_parent"
 >

    <TextView
        android:id="@+id/tv"
        android:layout_width="wrap_content"
        android:layout_height="wrap_content"
        android:textSize="30sp"
        android:text="sample"/>

    <!-- To have just string view remove the following code of image tag-->
    <ImageView
        android:id="@+id/location"
        android:layout_width="30dp"
        android:layout_height="30dp"
        android:src="@drawable/location"
        android:layout_alignBottom="@+id/tv"
        android:layout_toRightOf="@+id/tv"
        android:layout_toEndOf="@+id/tv"
        android:layout_marginLeft="15dp"
        android:layout_marginStart="15dp" />

</RelativeLayout>

Now lets create CustomAdapter which will inflate suggestion list to AutoCompleteTextView  as

Project -> new Class as.

name it as.
CustomAdapter.java

package com.ygutte.customactv;

import android.content.Context;
import android.view.View;
import android.view.ViewGroup;
import android.widget.ArrayAdapter;
import android.widget.Filter;
import android.widget.Filterable;

import java.util.ArrayList;

/** * Created by Yogeshwar on 7/7/2016. */
public class CustomAdapter extends ArrayAdapter<String> implements Filterable
        {
            private ArrayList<String> allList;
            private ArrayList<String> mValues;
            private ArrayFilter mFilter;

            public CustomAdapter(Context context, int resource, int textViewResourceId, ArrayList<String> allList) {

                super(context, resource, textViewResourceId, allList);
                this.allList = allList;
                mValues = new ArrayList<String>(allList);

            }

            @Override            public int getCount() {
                return allList.size();
            }

            @Override            public String getItem(int position) {
                return allList.get(position);
            }

            @Override            public View getView(int position, View convertView, ViewGroup parent) {
                return super.getView(position, convertView, parent);
            }

            @Override            public Filter getFilter() {
                if (mFilter == null) {
                    mFilter = new ArrayFilter();
                }
                return mFilter;
            }

            private class ArrayFilter extends Filter {
                private Object lock;

                @Override                protected FilterResults performFiltering(CharSequence prefix) {
                    FilterResults results = new FilterResults();

                    if (mValues == null) {
                        synchronized (lock) {
                            mValues = new ArrayList<String>(allList);
                        }
                    }

                    if (prefix == null || prefix.length() == 0) {
                        synchronized (lock) {
                            ArrayList<String> list = new ArrayList<String>(
                                    mValues);
                            results.values = list;
                            results.count = list.size();
                        }
                    } else {
                        final String prefixString = prefix.toString().toLowerCase();

                        ArrayList<String> values = mValues;
                        int count = values.size();

                        ArrayList<String> newValues = new ArrayList<String>(count);

                        for (int i = 0; i < count; i++) {
                            String item = values.get(i);
                            if (item.toLowerCase().contains(prefixString)) {
                                newValues.add(item);
                            }

                        }

                        results.values = newValues;
                        results.count = newValues.size();
                    }

                    return results;
                }

                @SuppressWarnings("unchecked")
                @Override                protected void publishResults(CharSequence constraint,
                                              FilterResults results) {

                    if (results.values != null) {
                        allList = (ArrayList<String>) results.values;
                    } else {
                        allList = new ArrayList<String>();
                    }
                    if (results.count > 0) {
                        notifyDataSetChanged();
                    } else {
                        notifyDataSetInvalidated();
                    }
                }
            }
        }
Now the main code i.e. MainActivity class as

package com.ygutte.customactv;

    import android.app.Activity;
    import android.os.Bundle;
    import java.util.ArrayList;
    import android.widget.AutoCompleteTextView;

public class MainActivity extends Activity {

        @Override        protected void onCreate(Bundle savedInstanceState) {
            super.onCreate(savedInstanceState);
            setContentView(R.layout.activity_main);

            ArrayList<String> findArrayList = new ArrayList<String>();

            findArrayList.add("Maharastra");
            findArrayList.add("Manipur");
            findArrayList.add("MadhyaPradesh");
            findArrayList.add("Karnatak");
            findArrayList.add("Andra Pradesh");
            findArrayList.add("Telangana");
            findArrayList.add("Udisa Pradesh");
            findArrayList.add("Meghalaya");
            findArrayList.add("Delhi");
            findArrayList.add("Kashmir");


            CustomAdapter adapter = new CustomAdapter(this,R.layout.indi_item, R.id.tv, findArrayList);

            AutoCompleteTextView ACTV = (AutoCompleteTextView) findViewById(R.id.ACTV);
            ACTV.setAdapter(adapter);

        }

    }

To Download the code click here...


Happy coading..............