Search This Blog

Thursday, June 30, 2016

Android Code Execution Step by Step Explanation with simple Hello World Example


Hay friend lets dig step by step Android Code execution with simple  Hello World App code:


Before going to dig a code  first lets understand some UI parts in android as bellow:


User Interface (UI) Group:

UI group is used to specify how to arrange the UI components.

Following are the UI groups used in android:

1)      Linear Layout :-Component arranged in  One after another manner.
2)      Table Layout :-Components arranged in row and columns manner.
3)      Frame Layout
4)      Relative Layout- By using this layout it is possible to move,resize and place UI components wherever on the screen.
5)      Grid Layout


UI Components:
1)      Text View
2)      Edit Text
3)      Button [Custom, Image, Toggle, Radio, Switch, Checkbox etc.]
4)      Image View
5)      Autocomplete Text View
6)      Spinner
7)      List View
8)      Gallery
9)      Grid View
10)   Web view
11)   Fragment
12)   View Switcher or View Flipper.

At this point of time just remember these things detailed explanation about all UI groups and Components we will discuss in upcoming posts....


So lets begin with our Hello World code Execution.......


Fig 1: Create new Project give name "Hello_World"

Fig 2: This will be your Project Structure.


Steps to create an Activity file:

 (**These steps are applied to any new activity we create)

         1)    Create class with sub-type of ”android.app.Activity”    

         2)    Same like main method in c/c++ /Java  in android activity OnCreate()  will invoke first so                    provide the implementation for OnCreate( )

         3)    Design the UI in XML, by using the following method we can set XML file context (UI) to the          java file as shown bellow....
                                                     “SetContentView (R.layout.xml-file)”


Example of: “Hello World” app:

 res->layout->activity_main.xml


         <?xml version="1.0" encoding="utf-8"?>  '

           Here you can see UTF-8 as default it is nothing but a Unicode format use in it


           In Android Studio default you will get as Relative Layout change it to Linear Layout,  Here xmlns means "XML namespace "   specifies package

where as namespace is nothing but the collection of Classes ,Interfaces,and collections etc.
  
                < LinearLayout xmlns: android=http://schemas.android.com/apk/res/android
                           android:layout_width="match_parent"
                           android:layout_height="match_parent"
                          android:orientation="vertical"
                                                                 >

             <TextView
                     android:layout_width="wrap_content"
                    android:layout_height="wrap_content"
                   android:text="Hello World!" />

           </LinearLayout>


  Here we have specified the attributes of  layout i.e. width and height we using and here "Parent" is the screen in which its going to be displayed.

And we can have orientation of components we are placing in Layout as Horizontal or Vertical as required


Main_activity.java file

package com.example.ygutte.Hello_World;


import android.app.Activity;

import android.support.v7.app.AppCompatActivity;

import android.os.Bundle; 


public class MainActivity extends Activity {
 
//must extends the Activity class


    @Override

    protected void onCreate (Bundle savedInstanceState) {
 
//Bundle is a class used to get state of an activity


        super.onCreate (savedInstanceState);


        SetContentView (R.layout.activity_main);   
 
   // to maintain the status of activity of supper class e.g. Function Overloading
 
/* Here we set the layout of screen as we designed in above xml file so that we use
                                  SetContentView () –converts xml to java
                                                                    -As abstract between xml and java file */


    }

}


Hope you understood the code now you can start yours...... 
Happy Coding...........

Saturday, June 25, 2016

Auto Complete TextView

 Auto Complete TextView in Android

Auto complete text view is Editable TextView which gives suggestion when we type related character in textview.

Click here for Introduction to Android

Click here for Android Project Directory Structure


as shown bellow:


In android we can use Autocomplete TextView in two way
1) AutoComplete TextView :
   Which will show only strings which we assign to it using ArrayAdapter<String>.
2) Custom AutoComplete Text View :
In custom we can assign strings and also images with strings and so on..


1) AutoComplete TextView:

So lets first see the example of Autocomplete TextView.

So check out my project structure  bellow and create yours:


main.xml


 <?xml version="1.0" encoding="utf-8"?>  

 <RelativeLayout xmlns:android="http://schemas.android.com/apk/res/android"  
   xmlns:tools="http://schemas.android.com/tools"  
   android:layout_width="match_parent"  
   android:layout_height="match_parent"  
   tools:context="com.ygutte.autocomplete_textview.MainActivity">  

   <AutoCompleteTextView  
     android:id="@+id/actv"  
     android:layout_height="wrap_content"  
     android:layout_width="200dp"  
     android:textSize="12sp"  
     android:layout_centerHorizontal="true">  
     </AutoCompleteTextView>  
 </RelativeLayout>  


MainActivity

 package com.ygutte.autocomplete_textview;
 import android.app.Activity;
 import android.support.v7.app.AppCompatActivity;
 import android.os.Bundle;
 import android.widget.ArrayAdapter;
 import android.widget.AutoCompleteTextView;

 public class MainActivity extends Activity
 {

    AutoCompleteTextView textViewCity;
    @Override    protected void onCreate(Bundle savedInstanceState)
    {
        super.onCreate(savedInstanceState);
        setContentView(R.layout.main);
        textViewCity = (AutoCompleteTextView)findViewById(R.id.actv);
        //String[] Cities = getResources().getStringArray(R.array.Array_city);
        String[] Cities = {"Mumbai", "Pune","Hyderabad","Kolkata","Chennai","Bengaluru"};

        ArrayAdapter<String> adapter =new ArrayAdapter<String>(getApplicationContext(),R.layout.support_simple_spinner_dropdown_item,Cities);
        textViewCity.setAdapter(adapter);
        textViewCity.setThreshold(1);

    }
}


Try above example and Happy coding .......


Friday, June 24, 2016

Android Directory Structure

 Android Project Directory


Click here for Android Introduction
Before going to the first project it is must , we should know the Android Project Directory Structure.

So lets begin with it....

check out he following snapshot of android project directory structure

(This structure is  Eclipse IDE  )


Fig.1 Project Structure in Eclipse IDE

This bellow one Structure  is in Android Studio


Fig.2 Project Structure in Android Studio


So friends before going for any project development in any of the technology it is very important to know the structure of the project we going to develop.                                                                        

similar to any other technology in android project also have structure as shown above fig.1 in Eclipse IDE and fig.2 is in Android Studio , now  its  official IDE to develop android apps 
  

1) Src i.e. source (Eclipse) / Java (studio) :

 This folder contains all the packages and java files we create (*.java )

2) Assets : In this folder we put the files which we use in our app i.e. files like html pages,Database files etc.


3)Lib (Library): In this folder we can have the .jar files i.e.additional library files in app.

4)Res (Resources) :


The above resource structure is in Eclipse where we can store different size images related to screens and XML drawable files which contains design /style codes.

where


Following are the  densities supported in android app

  • ldpi (low) ~120dpi
  • mdpi (medium) ~160dpi
  • hdpi (high) ~240dpi
  • xhdpi (extra-high) ~320dpi
  • xxhdpi (extra-extra-high) ~480dpi
  • xxxhdpi (extra-extra-extra-high) ~640dpi
             Where dp stands for Density-independent pixel .

so in in these different folders we can place our different sized images so that app can support different resolution screens android  devices.


R.Java ?

-Here ‘R’ is termed as resource

Purpose: r.java is an abstraction between the java file and different resources available in resource folder
-A resource may be an UI component or file.
-For every resource in resource folder, it creates a static integer field in R.Java so that we can access the resource into our java code with the help of static integer field i.e. id of the resource.

 Eg: R.drawble.image-name (i.e. any resource name)
       R.id.id-name.

          -R.java class
          -R.java is nothing but an internal class
          -It contain/create static internal class for folder/file each you place in folder


Eg: Class R
       {
          Static class drawable {
                                                        public static int icon { }
                                                   }
       }

XML:
In this  data is  enclosed  with tags.
     
In XML we can create our own tags, which is not possible in html.

Normally follow Rules used
                -Every element must be properly nested.
                 -Should not contain space between the tag names.
                -Tagging should not start with numbers and special symbols.
                -Should contain only one root element.
To define own rules to the xml file –go with DTD[Document Type Definition] and /or XSD[XML scheme Definition –it is latest and used in android.].
Following data  formats are used in XML
-UTF-8 (default in adnroid)
-UTF-16

Advantages:
-Used to share data between two technologies.
-XML is used as textual database
-XML is used as deployment descriptor.
Eg: web.xml, web_config.xml,manifest.xml.


5) Layout folder in res : This folder contains XML files which have the view design in XML format. 

6) Values : this is another folder in res directory where we can put dimensions xml file  string resources file, styles.xml and color.xml file and so on which are usefull in app, 

7) Manifest . xml :

This file provides complete description about the app i.e . number of activities used in app,the permissions needed to install the app and so on.

The important thing is android platform before starting and installing the app reefers to the manifest file.


8) Gradle Script :
Is the new thing added to the android studio.
Gradle is a build system used 

Have you ever wondered why the res folder is in the same directory as your src folder?
This is where the build system enters the picture. The build system automatically takes all the source files (.java or .xml), then applies the appropriate tool (e.g. takes java class files and converts them to dex files), and groups all of them into one compressed file, our beloved APK.
This build system uses some conventions: an example of one is to specify the directory containing the source files (in Eclipse it is \src folder) or resources files (in Eclipse it is \res folder).
Now, in order to automate all these tasks, there has to be a script; you can write your own build system using shell scripting in linux or batch files syntax in windows. Got it?
Gradle is another build system that takes the best features from other build systems and combines them into one. It is improved based off of their shortcomings. It is a JVM based build system, what that means is that you can write your own script in Java, which Android Studio makes use of.


Thank you guys hope you understood the directory structure in detail. !

Tuesday, June 21, 2016

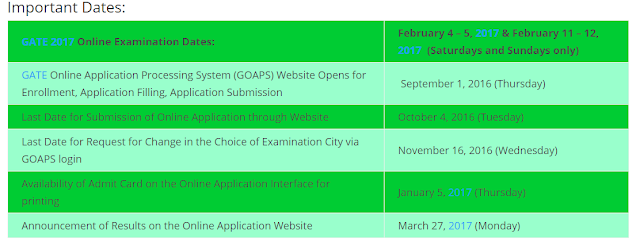
Gate 2017 Important Dates And Details

Gate 2017 Important Dates And Details:

The Graduate Aptitude Test in Engineering 

(GATE 2017) online examinations will be held on February 4, 5, 11 and 12 next year (2017).

 Indian Institute of Technology, Roorkee is the organising institute for the exam. The final schedule of the examination will be displayed on the official website .


And some other important details given on the official website:
1) GATE online application processing system (GOAPS) website will open for enrolment, application filling, application submission on September 1, 2016.
2) The last date for submission of online application is October 4, 2016.
3) The last date for request for change in the choice of examination city is November 16, 2016.
4) The date for availability of admit card for printing is January 5, 2017.
5) The results will be announced on March 27, 2017.
The GATE, is an all-India entrance test to screen candidates for their comprehensive understanding of various undergraduate subjects in engineering, technology, architecture and postgraduate level subjects in science.

It is a test for admissions to the MTech, ME courses and direct PhD at the Indian Institutes of Technology (IITs), National Institutes of Technology (NITs), other government-funded technical institutions and many private universities and institutes across the country.

 
 Official site


Note: For details visit official website of GATE 2017.

ANDROID

                              ANDROID                    

Introduction to Android

Hi friends,
These notes are for those who don't want to spend to much of time on reading but want to get everything in less time so here i am for you with short notes on android .

-You can refer these notes for your last our preparation of interview. 
-And the best thing is you will get explanation to each and every line of code the examples you get here.
-So let's start....


Prerequisites for Android:

   You might have herd like you need to master  java and advance java and  bla bla bla.....,

   Yes, those who say it they are true but not 100%, as per my experience  what i know is if  you better known C and C++( OOP concepts) you  the one who can start developing your own android app's.


History:
Does it matters lot to know history of android?

No ,not so but you should know something like what?  Why? And How?

So what is android?
Now days any one can tell you easily its thing which made you smart with things to do smartly. 
"As your mobile device quickly has become the easiest portal into your digital self."
                                                                                                   

And in technical terms:
“ It is nothing but an OS (Operating System) introduced by Google in November 2007 with its Android alpha and  the first commercial  version, Android 1.0 in September 2008 and still they are developing it .”


       Name and Version
               Release
   API Level
                1.0
Sept 2008
1
                1.1
Feb 2009
2
Cupcake (1.5)
April 2009
3
Donut    (1.6)
Sept 2009
4
Éclair   (2.0 – 2.1)
Oct 2009
5-7
Froyo   (2.2 – 2.2.3)
May 2010
8
Gingerbread (2.3 – 2.3.7)
Dec 2010
9-10
Honeycomb (3.0 – 3.2.6)
Feb 2011
11-13
Ice Cream Sandwich
 (4.0 – 4.0.4)
Oct 2011
14-15
Jelly Bean (4.1 – 4.3.1)
July 2012
16-18
KitKat
 (4.4 – 4.4.4,
 4.4W – 4.4W.2)
Oct 2013
19-20
Lollipop (5.0 – 5.1.1)
Nov 2014
21-22
Marshmallow (6.0 – 6.0.1)
Oct 2015
23
N  (Developer Preview)


                                  Table: 1 Android Versions And API levels


    Setup Android Environment:
         There are  three different  ways to do this: 


               1) Manually using
                  -Eclipse IDE

                  -ADT Plugin

                  -Android SDK

      2) ADT Bundle: this alone is collection of above three components.


      3) Android Studio: Now it’s an official IDE for android development


Click here  for Android Directory Scture notes